The Ultimate Treadmill Belt Guide: Everything You Need to Know
-
 Chapter 1 Introduction of Treadmill Walking Belt
 -
 Chapter 2 5 Signs You Need a New Treadmill Belt
 -
 Chapter 3 How to Choose the Right Treadmill Replacement Belt
 -
 Chapter 4 Treadmill Maintenance and Care
 -
 Chapter 5 Treadmill Belt Installation Guide
 -
 Chapter 6 Troubleshooting Common Treadmill Belt Issues
 -
 Chapter 7 Top Treadmill Belt Brands and Prices
 -
 Frequently Asked Questions (FAQs)
-
Chapter 1Introduction of Treadmill Walking Belt
-
Chapter 25 Signs You Need a New Treadmill Belt
-
Chapter 3How to Choose the Right Treadmill Replacement Belt
-
Chapter 4Treadmill Maintenance and Care
-
Chapter 5Treadmill Belt Installation Guide
-
Chapter 6Troubleshooting Common Treadmill Belt Issues
-
Chapter 7Top Treadmill Belt Brands and Prices
-
Frequently Asked Questions (FAQs)
- Q1. How often should I replace my treadmill belt?
- Q2. Can I repair a damaged treadmill belt?
- Q3. What is the best treadmill belt material?
- Q4. How do I lube or grease my treadmill belt?
- Q5. Can I use a treadmill belt from a different brand?
- Q6. What size treadmill belt do I need?
- Q7. What size treadmill belt for running?
- Q8. How do I know when it is time to replace my walking belt?
- Q9. Why is my belt slipping?
- Q10. Where do I find my treadmill model and serial number?
- Q11. How to center my walking belt?
- Q12. How do I tighten my walking belt?
- Q13. Do you have instructions to replace the walking belt?
- Q14. Why does my belt slow down when I step on it?
- Q15. Why does my treadmill shut down during a workout?
- Q16. Why do I smell burning from my treadmill?
Chapter 1
Introduction of Treadmill Walking Belt
Ready to Run... or Walk... or Maybe Just Stare at the Wall?
Let's face it: treadmills aren't exactly the most exciting piece of home gym equipment. Love’ em or hate ‘em, they've become a staple in many households.
Quite contrary to its original purpose of punishing prisoners.
Shocking, isn’t it?
Inventor William Cubitt's "Tread-Wheel" was a practical application of his "no pain, no gain" principle used for grinding grain, pumping water, and even ventilating underground spaces.Today, however, it is used as a form of exercise, rehabilitation and therapy.
Now, a walking or running belt is an essential part of a treadmill. And while it might seem like a simple piece of rubber, a treadmill belt is actually a complex piece of engineering designed to withstand the pounding of countless feet.
So, whether you're a seasoned runner or a casual walker, no matter how many years you have been using one, there's so much more to your treadmill belt than meets the eye.
This extensive guide will leave no stone unturned in discovering the little-known world of treadmill conveyor belts & its components while uncovering some surprising facts that will make you sound like an expert on treadmills.
Function and Purpose of Treadmill Belts
 Since many people do not like going out for their regular workouts or do not have time to do so, they use a treadmill instead. Yet, treadmill belts remain the unsung heroes of home fitness.
A treadmill belt is a continuous loop of material that runs over a deck and is powered by a motor. It is the belt you walk on or run on when you use a treadmill machine.
Designed to mimic the feel of outdoors, its primary purpose is to provide a smooth walking, jogging or running surface. However, natural surfaces and treadmill surfaces are very different, which is why treadmills are designed to absorb shock. This protects your knees and ankles from impact or jerks.Importance & Benefits of using High-quality Treadmill Belts
Premium treadmill belts are engineered to withstand the rigors of regular use. Here's why investing in one is TOTALLY worth it:
1. Enhanced Performance: A high-quality treadmill belt provides optimal performance with traction and a smooth running surface. This drives better results in less time, as you can maintain a consistent pace without interruptions caused by belt slippage or unevenness.
2. Superior Durability: Walking belts, especially those with a urethane top surface, offer durability and longevity. Urethane provides superior traction, and reduced friction.
3. Improved Safety: A stable and slip-resistant belt surface minimizes the risk of accidents and injuries. This is especially crucial for individuals with joint issues or those recovering from injuries.
4. Long-term cost Savings: With greater durability & longevity, a premium quality belt is bound to save you repair & replacement costs in the long run.
Understandably, a properly functioning treadmill belt is crucial for safety. It helps prevent accidents by ensuring the user can maintain their balance.
Treadmill walking belts vary greatly in size, material, and type, which is why manufacturers and online sellers provide limited information on their product pages. A basic understanding of these variations will help you decide what walking belt best suits your treadmill.
As a first-time buyer, how will you decide which is best for you? Read below to learn how.
Types of Treadmill Belts
Have you ever wondered why some treadmills feel smoother than others? The answer might lie in the type of belt they use.
Treadmill walking belts come in two primary varieties: flat and slat. While both types serve the same fundamental purpose that is propelling you forward—they offer distinct advantages and disadvantages.
Flat vs Slat Belt - What’s the Difference?
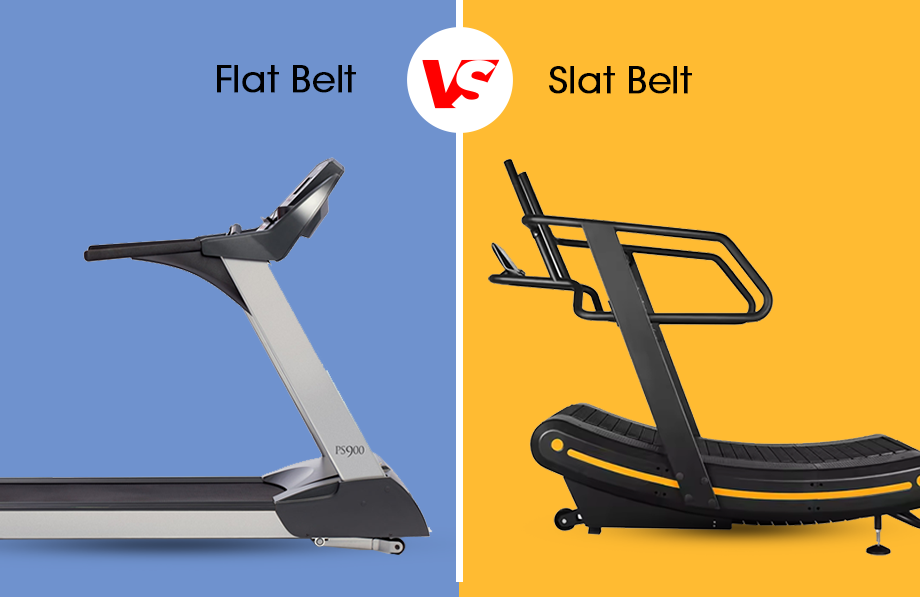
A flat treadmill belt is the most common type found in both home and commercial gyms. As the name suggests, it consists of a flat, continuous surface (belt) that runs along the deck of the treadmill.
Slat belts, on the other hand, are composed of individual slats that move independently. They consist of a series of interconnected slats that flex and pivot as you run or walk.
Single-ply vs Multi-ply Belt
1-Ply or Single-Ply: The most basic and least durable option, 1-ply belts are typically found on budget-friendly treadmills. Lower end models have a thickness of as low as 1.2 mm, while more expensive ones can be as thick as 1.8mm.
2-Ply or 3-ply: Multi-Ply belts are suitable for moderate-intensity workouts. The thickness of these belts can range between 1.6mm to 2.8mm.
Note: When a belt is advertised as 3-ply, the count sometimes includes the layer of glue between the plies. However, 2-ply belts only count the actual layers of material, excluding the glue.
Commercial vs. Residential Belts
Single-ply belts are used primarily on residential treadmills while commercial models use the more durable, high-quality 2-ply belts. These are more resistant to wear and tear and require less maintenance as compared to 1-Ply belts.Treadmill Belt Construction & Layers
These are typically constructed using a combination of synthetic materials designed to withstand the rigors of regular use.
Here's a breakdown of the common materials used along with their functions:
1. Surface Layer: This is the top layer of the belt that comes into direct contact with your shoes. It's usually made of PVC and sometimes urethane, chosen for its durability, traction, and ability to withstand friction and wear.
2. Reinforcement Layer: This layer, often made of fiberglass or Kevlar, adds strength and stability to the belt, thereby preventing it from stretching and tearing. These days, reinforced PVC using a carbon weave is used for strength and static dissipation.
3. Base Layer: This is usually a woven fabric made of polyester or urethane. It provides structural integrity to the belt by supporting all the other layers.
Some belts may also feature additional layers for specific purposes, such as a lubricant layer to reduce friction. Similarly, few belts come with perforations for better drainage or special tread patterns for enhanced grip.
 Did you know?
The first US patent for a treadmill/training machine was issued on 17 June 1913 for the rehabilitation of heart and lung patients by Claude Lauraine Hagen.
Chapter 2
5 Signs You Need a New Treadmill Belt
Wow! I got tired just reading it. Now, this treadmill must have entailed a lot of wear and tear. All its components, including its conveyor belt, must have been capable of withstanding such an ordeal. How to tell if your treadmill belt is worn out? You can do a thorough inspection of the walking belt yourself to look for signs that suggest belt needs replacing ASAP. Start by examining the running surface of the belt for signs of fraying, cracking, or excessive wear. Look for areas where the material appears thin or discolored. This is a big red flag. If you spot any cracks, tears on the edges, or holes in the belt, it's time to replace it. Next, check the edges of the walking belt for any signs of curling or tearing. Curled edges indicate a belt that is too tight or damaged and getting weak. Treadmill Doctor says, “these torn edges can be cleaned up with a box knife, but leaving rough edges will damage the belt more.”. Next, inspect the belt's underside for smoothness or discoloration. Run your hand along the belt. If you feel areas that are super smooth, almost like they've been polished, that's a sign of a bad treadmill belt and must be replaced. One with some shelf life should have some grip and not be slippery. Another crucial factor to consider is the tension on the belt. A loose belt can cause slippage, affecting your workout experience and potentially leading to injuries. To check the tension & adjust the walking belt, lift it from the deck. If there's more than a few inches of play, the belt needs tightening. A squeaky treadmill belt is like nails on a chalkboard for your ears. It's usually a sign that the belt is dry and needs lubrication. Usually, squeaking is related to the drive belt. The best cure is handheld bar soap on the grooves of the drive belt. But if the squeaking is really bad, it necessitates drive belt replacement.
 Fun Fact: The world record for the longest treadmill run is held by Bjørn Tore Kronen Taranger (Norway), who ran for 24 hours straight. He managed to run 264.52 kms on Oct 12,2018 when he set this record.
1. Frayed Treadmill Belt
2. Curled Edges
3. Smooth Underside
4. Loose Belt & Slippage
5. Squeaky Noise
 Expert Tip: Do pay attention to your treadmill's performance. If you notice a decrease in speed accuracy or a sluggish feel, it could be due to a worn-out belt.
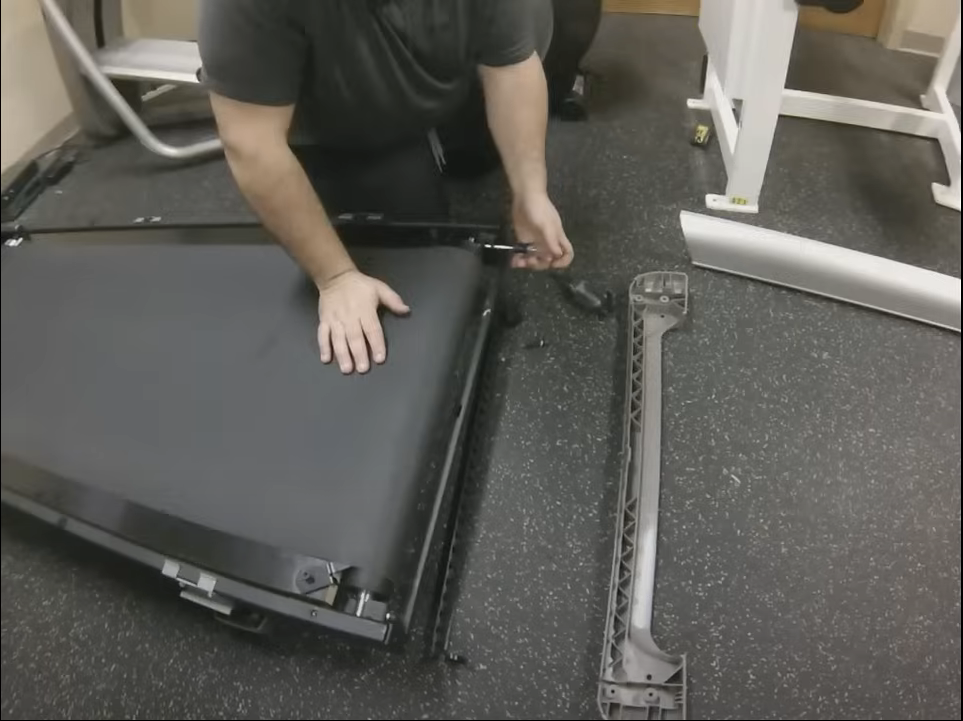
Treadmill Belt Replacement: A Step-by-Step Guide
2. The next step is to remove the front and rear rollers.
Note: Typically, on most machines, you'll have two adjustment bolts in the rear and one in the front. Just be sure that when you go to remove the adjustment bolts, you count the number of turns it takes to remove the bolts.
This way, when you put the bolts back, you'll know how many times you have to turn bolts, so there will be very little room for adjustment.
3. The last step is to remove the deck bolts. After this, remove the deck and then slide the belt out. Now, clean the deck and roller surfaces with mineral spirits in a well-ventilated area.
Let’s start the reassembling process with a new belt.
4. Just tilt your deck to align the belt on the deck of the treadmill and make sure that it's centered and straight.
5. Place the deck where it needs to be. The tutorial video explains how to do this correctly (Timestamp: 10:50).
6. So once we have the deck in place and secured in the frame with bolts, put the front roller on and stick the motor belt on. Now, screw in the front roller bolt and turn it the number of times you counted while disassembling.
Note: You'll notice once you get it on that you can't put the front roller down on that slot. But the pressure and tension from the rear roller bolts when you go to tighten it is going to put it down in this slot.
7. Now slide in the rear roller and get your bolts started enough to where the threads will grab on each side. Normally it's going to take 20 or 30 turns, sometimes even more to get this where it needs to be.
Expert Tip: Do not tighten one bolt completely. Go about 10 turns and then move to the other side of the rear roller & keep alternating similarly.
8. After you tighten the rear bolts, your front roller will come down in the slot and be all set.
9. Finally, put back the side rails and motor hood. Your treadmill is ready for use.
When to Replace Treadmill belt?
A quality belt used 5 days a week should be lubricated once a year and replaced every 5-7 years. This timespan decreases as the usage increases.
What does Treadmill Belt Replacement Cost?
The cost of replacing a treadmill belt typically ranges from $300 to $400, including the cost of the belt itself and the labor involved. It varies widely depending on your location, shipping charges and cost of other parts, if they need to be replaced too.Common Treadmill Belt Problems and Solutions
Apart from belt damage due to rigorous use and insufficient lubrication, other common issues you may face in the long run include:
1. Treadmill Belt Slipping
A slipping belt can be very dangerous. This might feel like your shoes slipping on the surface of ice. When the belt and deck become worn, they can create too much friction, causing the belt to stall or skip.
Here's why it happens:
Loose Drive Belt: A loose drive belt, identified by black dust underneath, indicates wear and tear and requires replacement.
Loose Walking Belt: Similarly, a loose walking belt can lead to slipping. But it can be easily adjusted at the rear roller.
Too Much or Too Little Lubricant: Lubricant keeps the belt moving smoothly, but too much or too little can cause problems.
Worn-Out Belt: Over time, the belt can wear out and lose its grip.
While tightening a loose belt may temporarily alleviate the slipping, it can put undue stress on the motor, roller bearings and electronic components. Therefore, a thorough inspection and appropriate repair or replacement are crucial to ensure optimal treadmill performance and longevity.
2. Belt Misalignment
When the belt isn't aligned, it's like the track is crooked. This can make it harder to run or walk, and it can even damage the belt and the treadmill itself.
Here's what happens when the belt is misaligned:
Uneven Wear: The belt wears out faster in certain areas, making it less durable.
Noise: A misaligned belt can cause squeaking or rubbing noises.
Difficulty Running: It can feel like you're running on uneven ground, which will be uncomfortable and accident-prone.
3. Treadmill Belt Squeaking Noise
Just like a bike chain needs oil to move smoothly, your treadmill has parts that need a little lubrication, too. When these parts get dry, they start to squeak, just like a rusty bike chain.
Here's what you should do if your treadmill is squeaking:
Replace Rollers: If a roller is squeaking, it must be changed.
Check Drive Belt: Inspect the drive belt for any damage and replace it if needed.
4. Belt Tracking Issues
Belt tracking issues happen when the belt starts to drift to one side. It's like the car drifting off the road! This can cause uneven wear on the belt, making it much less effective and much more dangerous.
Why does this happen?
Treadmill Doctor says “If the treadmill has been recently moved or serviced, use a carpenters level to make sure that the measurement on the width of the treadmill is level...this is the most common reason I find for belts that will not track properly.”
Additionally, over time, the belt might wear down more on one side than the other, causing it to drift.
To correct belt tracking:
Realign the Belt: Use the rear roller adjustment bolts to center the belt. This will ensure even wear and optimal performance.
Replace Damaged Parts: If rollers or other components are damaged, replace them to prevent further issues.
5. Treadmill Belt Speed Problems
This could most likely be due to speed signal not reaching the drive motor properly & can be fixed by an expert. However, in certain cases, it is because of belt-deck friction.
Watch our video to troubleshoot treadmill Speed Fluctuation problems at home.
Treadmill Safety Precautions to Prevent Accidents
Did you know?
You are more likely to die by lightning than by working out on a treadmill.
But does this mean you don’t have to be cautious with a treadmill? NO.
In fact, you have to be even more cautious if you have kids below the age of five or pets in your house.
If you keep in mind a few treadmill safety tips and precautions, you can significantly reduce your risk of injury and enjoy a safe, effective workout.

1. Slips, Sprains and Strains
Treadmill injuries like slips, sprains and strains are among the most prevalent and are least dangerous. These injuries occur due to improper form, fatigue or sudden changes in speed or incline. Slips are often caused by wet surfaces on the treadmill belt, which leads to falls.
One important treadmill safety tip to avoid such injuries is maintaining a good posture and keeping your body taut at all times.
2. Burns
Treadmill burns are friction burns that can occur when children or limbs get caught in the conveyor belt of a treadmill. Treadmill burns are the second most common cause of hand injury after stovetop burns. They are more severe than contact hand burns in the depth of injury.
A basic treadmill safety rule to prevent such burns is keeping them off children’s reach, especially those below five.
3. Concussions and broken bones
Both of these injuries are very rare. Treadmill-related concussions can occur if a user falls off the treadmill or hits their head on the machine. Broken bones can occur if a user falls off a fast-moving treadmill belt.
An important treadmill accident prevention advice to avoid such accidents is not to lose concentration and run at slower speeds if you experience excessive fatigue.
Treadmill Safety Considerations for Specific Groups to Prevent Injuries
Other than the age-specific tips discussed below, you must always clip the safety key to your clothes before starting any workout. Make it a regular habit.
Treadmill Safety for Beginners
Always begin with short, low-intensity workouts and gradually increase the duration and intensity as your fitness level improves day by day. Also, familiarize yourself with the treadmill settings, such as speed, incline and especially, emergency stop buttons.
Treadmill Safety for Seniors
Older adults may have reduced balance and reaction time. This makes them more susceptible to falls. One safety measure is to use handrails for support and choose a treadmill with a low step-up height.
Treadmill Safety for Children
Approximately 8700 injuries from home exercise equipment occur annually in children in the United States. In 2014 alone, about 24,000 people were admitted to US hospitals with treadmill injuries, according to Consumer Product Safety Commission (CPSC) estimates.
Thus, children should always be supervised by an adult while using any fitness equipment. When you are using a treadmill, do not let your kid go anywhere near it while it's running, especially the moving parts like the belt.
Keep the safety key with you if your kids know how to turn the machine on.
Fun Fact: Dog treadmills are also available for both home and clinical use as part of rehab programs. They usually have a long-running surface (ample for dogs), open front & back entries, and side rails to prevent your pet from falling off.
Chapter 3
How to Choose the Right Treadmill Replacement Belt
We just covered the basic purpose and types of treadmill belts, but there is much more to choosing “the one.” The best treadmill belt is the one which is right “fit” for your specific model and made of right “material” to endure the intensity & frequency of your workouts. This section will explain all key factors in detail to help you make the right selection.
Treadmill Belt Measurement Guide
Treadmill Belt Buying Guide
 Since belts come in various lengths, widths, and materials, each factor is key in fulfilling the intended utility.
Factor 1: Width
The standard treadmill belt width is 18 to 22 inches and plays a crucial role in determining your stability during workout.
The ideal belt size for you, however, depends on your height and stride length.
-
Narrow Belts (18 inches): These belts are suitable for individuals who prefer a more compact running surface. They are commonly found on budget-friendly treadmills and are, in most cases, used for walking purposes.
-
Standard Belts (20 inches): This treadmill 20 inch wide belt provides a good balance between space and affordability. It is suitable for serious runners.
-
Wide Belts (22 inches): These are specifically designed for those who require ample space to move freely. Wide belts provide a more comfortable and spacious running experience. These are ideal for. professional runners. However, wider belts cause the machine to wear the most.
Factor 2: Thickness
The thickness of a treadmill belt is another crucial factor to consider. It directly impacts the durability, cushioning, and overall performance of the belt.
There are three standard thicknesses available in the market:
-
1-Ply: The most basic and least durable option, 1-ply belts are typically found on budget-friendly treadmills. which have a thickness of as low as 1.2 mm, while more expensive ones can be as thick as 1.8mm.
-
2-Ply: 2-ply belts are suitable for moderate-intensity workouts. A thicker belt is more resistant to wear and tear and requires less maintenance as compared to 1-Ply belts. The thickness of these belts can range between 1.6mm to 2.8mm.
-
3-Ply: Such belts are only available as conveyor belts and are not suitable for treadmills. The thickness of these belts can also put a lot of pressure on the motor, so try to avoid such belts for your treadmill as more plies don’t mean better quality.
Note: When a belt is advertised as 3-ply, the count sometimes includes the layer of glue between the plies. However, 2-ply belts only count the actual layers of material, excluding the glue.
Factor 3: Length
The length of a treadmill belt is a crucial factor to consider when choosing a treadmill, particularly if you're a runner. Here's why:
1. Stride Length: Taller individuals or those with longer strides need a longer belt to accommodate their natural running gait. A shorter belt can feel cramped and restrict your movement.
2. Running Intensity: If you plan on running at higher speeds or inclines, a longer belt provides more space to extend your stride without worrying about stepping off the back.
3. Comfort and Safety: A properly sized belt ensures a comfortable and safe running experience, reducing the risk of injuries.
Standard Belt Length Recommendations
-
Walkers: A belt length of 48 inches is generally sufficient for walking workouts.
-
Joggers: A belt length of 48-54 inches is recommended for comfortable jogging.
-
Runners: Taller individuals or those who run at higher speeds should consider a treadmill belt length of 52 inches for optimal performance and safety.
Treadmill Doctor Expert Tip: Even though treadmill 60 inch belt is quite the rage right now, it isn’t ideal in the long run due to greater wear & tear in comparison to other lengths.
Factor 4: Material Selection
Treadmill belts can be made from a variety of materials, each with its own set of benefits and drawbacks.
-
Polyester woven fabric: This forms the base layer, providing structural support and durability.
-
Polyvinyl Chloride (PVC): This layer is applied over the polyester fabric, adding rigidity and strength to the belt. It helps prevent stretching and sagging, ensuring a smooth and stable running surface.
-
Resilient foam: This material, often made of polyurethane or EVA foam, provides cushioning and shock absorption, reducing impact on the user's joints. However, the belts made from this provided poor wear and were expensive; thus, they are no longer used.
-
Polyurethane: The top layer, which the user directly interacts with, is typically made of a durable and comfortable material like polyurethane. But only 10% of all belts produced use it due to its high cost. So, almost all belts are PVC-coated these days.
Factor 5: Brand Compatibility
As explained in the beginning of this treadmill belt selection guide, ensuring the right fit is the most crucial and thus, replacement part should be compatible with the brand & model of your fitness equipment.
You have two options to purchase: Original Equipment Manufacturer (OEM) parts that you can buy from original manufacturer and aftermarket universal options available at various online retailers.
OEM vs. Aftermarket Parts
Fun Fact: In 1991, Life Fitness, launched their first treadmill 9500HR. It featured their patented shock absorption system.
Chapter 4
Treadmill Maintenance and Care
Proper treadmill maintenance not only prolongs the life of your machine but also reduces the need for frequent replacements, minimizing your carbon footprint. In this chapter, we'll explore eco-friendly tips and techniques to keep your treadmill running green.
Regular Maintenance Schedule for your Fitness Buddy
To keep any machine working properly, you must take care of it on a regular basis. Here are few small actions that can form a part of your daily/weekly routine.
Annual Check: You must inspect the walk belt and deck for wear. Replace the walking belt if it seems worn, frayed or smooth on the underside.
To be prepared for any/all of said issues, consider investing in the Treadmill Doctor Treadmill Care Kit. This limited-time kit includes our Treadmill Care Pamphlet, Treadmill Belt Cleaner (with our new eco-friendly formula), Belt Dressing, Compressed Air, and two applications of our World-Famous Treadmill Lube.
How to Clean Treadmill & its Components: Step-by-step
After each use, you should wipe down the belt with a damp cloth to remove sweat and debris.
Daily Cleaning
1. Turn off and unplug the treadmill.
2. Use a soft brush to remove loose dirt and debris from the belt.
3. Wipe down the belt with a damp cloth and a mild cleaning solution.
4. Dry the belt thoroughly with a clean cloth.
Weekly Cleaning
To remove stubborn dirt and debris,
Apply a small amount of isopropyl alcohol to a cloth and gently wipe the affected areas.
A rubber eraser can be used to remove sticky residue or marks.
How to Lubricate your Treadmill
Lubrication is a small task that can be easily done and will take you hardly 5 minutes.
If using water-based silicone or a similar product, you may need to use it as often as monthly or every few months, depending upon the humidity levels. Fortunately, by spending merely $15 per year on Treadmill Doctor World Famous Lube, you can prevent your treadmill from sustaining damages that could cost thousands of dollars. What you'll need:World Famous Treadmill Lube or silicone-based lubricant specifically designed for treadmills
Clean cloth
User manual for your treadmill
Treadmill Belt Lubrication Guide
1. Unplug the treadmill as it is crucial for safety.
2. Use a clean, damp cloth to wipe down the belt, removing any dirt, sweat or debris.
3. Refer to your treadmill's user manual to identify the specific areas where lubrication is needed. Typically, it's the underside of the belt where it contacts the deck.
4. Apply the lubricant:
Lift the belt slightly.
Apply a small amount of silicone-based treadmill belt lubricant in a zigzag pattern along the underside of the belt.
Avoid over-lubricating, as excess lubricant can attract dirt and damage the belt.
5. Now, turn on the treadmill and let it run at a low speed for 3-5 minutes. This will distribute the lubricant evenly.
My Treadmill Manual Says Not To Lube. Does My Treadmill Need Lubrication?
While many treadmill manuals advise against lubrication, it's important to understand the context. The "maintenance-free" claim is often a marketing strategy rather than a strict rule.
In reality, most treadmills, especially those with traditional monofilament belts and phenolic decks, can benefit from proper lubrication. However, it's crucial to use the right lubricant and apply it correctly.
The primary concern with lubrication is the potential for damage to the belt and deck materials. Using an incorrect lubricant can actually accelerate wear and tear.
If your treadmill is equipped with a factory-impregnated belt, additional lubrication may not be required. However, over time, the lubrication can wear off, leading to increased friction and noise.
In such cases, consulting a treadmill expert or the manufacturer can provide guidance on whether re-lubrication is necessary and how to do it safely.
When (How often) to Lubricate your Treadmill?
The frequency of lubrication depends on factors like usage, belt type, and environmental conditions. As a general guideline,
lubricate your treadmill belt every 3-6 months in commercial usage and
once every year for light, residential usage.
How to Choose the Right Lubricant for your Treadmill?
Choosing the right one depends on the treadmill type, usage, and individual preference.
Factor 1: Type of Treadmill Belt Lubricants
Lubes come in various forms; each one has its own set of benefits.
Spray vs. Gel vs. Pure Silicone Oil
For residential treadmills, a spray lubricant is the most convenient option and has many takers. Gel or pure silicone oil is well-suited for commercial treadmills or heavy-duty use, as these concentrated silicone forms can withstand frequent and intense use.
Factor 2: Application Technique
It is important to apply the lubricant evenly to the underside of the belt, while following the manufacturer's instructions.
It is equally important to avoid over-lubrication, as excess lubricant can attract dirt and damage the belt and motor.
Thus, Treadmill Doctor recommends sprays & gel form of lubricant as they are easy to apply & spread evenly.
Factor 3: Longevity
Water-based silicone evaporates, and you might need to lubricate more often based on humidity levels. Avoid using WD-40 or other general-purpose lubricants, as they can attract dirt and damage the belt.
On the other hand, with our World Famous Lube, you can lubricate your equipment once a year and rest assured.
Fun Fact: The global treadmill market size was valued at USD 5.47 billion in 2023.
How to Prepare your Treadmill for Storage
Planning to store your treadmill for an extended period? Whether it's due to seasonal changes, a move, or simply a temporary break, proper storage is essential to protect your worthwhile investment. This chapter will provide practical solutions to common storage challenges, ensuring your treadmill emerges from storage as good as new.
Proper Storage of the Treadmill and its Belt
One of the most crucial components of a treadmill is the belt, which can be prone to wear and tear if not cared for correctly. In addition, the various accessories also need to be stored and maintained properly.
The factors that can destroy a treadmill are extreme temperatures and high humidity. Therefore, you should always store your treadmill belt in a cool, dry place, away from direct sunlight and heat sources.
Ideally, the storage area should have a temperature between 50°F and 70°F (10°C and 20°C) and a humidity level below 60%.
1. Cleaning Techniques
Before storing the belt, clean it thoroughly to remove dirt, sweat, and debris. Use a mild cleaning solution and a soft cloth to wipe down the surface. Avoid using harsh chemicals or abrasive materials that could damage the belt.
2. Proper Folding Technique
To prevent creases and damage, fold the belt carefully in a specific manner. Here's a step-by-step guide:
Lay the belt flat on a clean surface.
Fold the belt in half lengthwise.
Fold the belt in half again, creating a compact rectangle.
Ensure that the folds are smooth and even to avoid stress points.
3. Recommended Storage Containers
To protect the belt from dust and moisture, store it in a suitable container or bag. Use
Treadmill Belt Storage Bags: These specialized bags are designed to fit treadmill belts and provide adequate protection.
Plastic Storage Bins: Clear plastic bins can be used to store the folded belt.
Covers: Cover the stored accessories with dust covers or tarps.
Plastic Wrap: Wrap individual parts in plastic wrap to provide additional protection.
Vacuum-Sealed Bags: Vacuum-sealed bags can help reduce the size of the stored belt and protect it from moisture and pests.
Treadmill Accessory Storage
Small Accessory Storage
Small Parts: Keep small accessories like clips, keys, and water bottle holders organized using:
Small Storage Bins: Use small bins or organizers to categorize and store these items.
Drawers: If your treadmill has built-in drawers, utilize them to store small accessories.
Magnetic Strips: Magnetic strips can be used to store small metal items like keys and clips.
Large Accessory Storage
Storing the Handrails and Console:
Disassembly: If possible, disassemble the handrails and console into smaller parts for easier storage.
Padding: Wrap delicate parts in soft materials like bubble wrap or cloth to prevent scratches.
Chapter 5
Treadmill Belt Installation Guide
Getting your treadmill belt back on track can seem daunting, but with the right guidance, it's a manageable task. This guide will walk you through the process of removing, inspecting, and reinstalling your treadmill belt.
DIY Installation Guide
Treamill Belt Installation Tools required:
A Phillips-head screwdriver is needed to remove the deck cover and other components. Also, Allen wrench set, sharpie marker, & flat head screwdriver will be needed.Step-by-step replacement/installation process:
If you have some basic knowledge about treadmills, you can follow these crisp steps below to replace your treadmill belt.-
Unplug your treadmill from the power source.
-
Remove the motor hood and side rails.
-
Detach front and rear rollers carefully. Use the sharpie marker to mark where the front roller and rear roller bolts are tightened to properly.
-
Remove the deck bolts on the side opposite to the drive belt & front roller pulley.
-
Clean the deck and roller surfaces with mineral spirits in a well-ventilated area.
-
Slide in the new belt on the deck.
-
Put the front roller on and tighten the bolt.
-
Put the rear roller on the belt and tighten both bolts.
-
Put back side rails and then the motor hood.
Common mistakes to avoid:
-
Improper Belt Alignment: The belt should be centered over the deck rollers to prevent uneven wear and potential damage to the belt. Use the sharpie markers as a beginning point for the best starting point of keeping the belt aligned and tensioned.
-
Skewed Belt: A skewed belt can cause excessive friction and premature wear. Double-check that the belt is as straight on the rollers as possible and near parallel to the deck edges.
-
Incorrect Belt Tension: Overtightening the belt can strain the motor and lead to premature wear on both the belt and motor. Conversely, a loose belt can slip, making your workout less effective and potentially dangerous. Refer to the user manual for the recommended tension.
Fun Fact: Technogym revolutionized home workouts in 2002 by introducing the first smart treadmill equipped with a built-in TV and digital connectivity to monitor and enhance every workout.
Professional Installation: When to seek expert help?
While replacing a treadmill belt can be a DIY project, it's crucial to recognize when professional help is necessary. If you lack mechanical expertise or feel uncomfortable with the technicalities of it all, it's best to consult a professional technician.
Seek professional assistance if you encounter difficulties during the belt replacement process, such as misalignment, improper tensioning, or damage to the deck or motor.
If your treadmill is an older model with unique components or complex disassembly procedures, professional installation is recommended to ensure optimal performance and safety.
How much would Treadmill Belt Installation Cost?
The cost of professional treadmill belt installation varies depending on several factors, including the brand and model of your treadmill. This might also include the complexity of the installation process and your geographic location.
Generally, you can expect to pay between $100 and $300 for professional installation. This cost typically includes the labor for removing the old belt, installing the new belt, and properly aligning and tensioning it.
Additionally, you may need to purchase a new belt, ranging from $100 to $250 depending on the size and quality.
How to Find Certified Treadmill Technicians Near You?
Treadmill Doctor is your go-to solution. Our skilled technicians are available to assist you online or over the phone at 800-750-4766, Monday through Friday, 8:00 AM to 5:00 PM CST.
Our services are accessible across the United States and Canada. Whether you're facing a simple issue or a complex repair, we're here to help.
Post-Installation Care
Gradual Usage
Just like a new pair of shoes, yourself and the equipment to adjust and settle with one another.
-
Thus, it's recommended to start with shorter, low-intensity workouts.
-
Gradually increase the duration and intensity of your sessions over the first few weeks.
This slow & steady approach helps the belt and motor to adjust to the increased stress and wear and tear.
Initial Adjustments
Now, it's time to make some initial adjustments if the belt is misaligned or slowing down.
-
One crucial adjustment is belt tensioning and centering. It's important not to overtighten the belt, as this can strain the motor and damage the deck.
-
Another key consideration is lubrication. While many modern treadmills come with pre-lubricated belts, it's still a good idea to lube as recommended by the Treadmill Doctor. He says, “Even though the manufacturer might advise against it, lubricating the walking belt will avoid premature wear & tear”.
Fun Fact: A measly $10 yearly investment in lubrication can safeguard your treadmill from expensive repairs worth thousands.
Monitoring Tips
-
Burning Smell: A burning smell from your treadmill is a serious red flag. Immediately stop using and unplug the machine. Common causes include excessive belt friction, motor or wiring shorts, or overheating of internal components.
-
Belt Slows Down or Stops: In this case a treadmill slows or stops as soon as you step on it. The most likely culprit is a worn belt or deck. Overtightening the belt or motor belt can also cause this issue. Less common causes include motor problems or controller issues.
Chapter 6
Troubleshooting Common Treadmill Belt Issues
Is your treadmill making strange noises or not tracking properly? Treadmill belt problems can disrupt your fitness journey which is exactly what you don’t want this year. This chapter will explore their causes and offer practical solutions to help you get back to your workout routine.
Belt Tension and Tracking Problems
Causes
1. Unlevelled Treadmill: It leads to poor posture, equipment damage, and belt tracking issues. Moreover, leveling issues can cause physical discomfort and increase the risk of injury. So, make sure to keep & use it where the treadmill is level with the floor.
2. Incorrect Belt Tension: If the belt tension is too loose or too tight, it can cause tracking issues. A loose belt will slip, while an overly tight belt drifts right & left; both are not ideal.
3. Worn or Damaged Rollers: The rollers on your treadmill guide the belt's movement. Over time, these rollers can become worn or damaged, causing the belt to track incorrectly.
4. Belt Damage: A damaged or worn belt can also contribute to tracking problems. If the belt is cracked, torn, or has uneven wear, it may not track correctly.
Solution
If your treadmill belt is not tracking properly, meaning it's veering to one side, it's crucial to address the issue promptly as it can lead to uneven wear, reduced performance, and potential damage to your treadmill.
To correct belt tracking, you'll typically need to adjust the rear roller. This roller is responsible for guiding the belt's path.
1. You'll find adjustment bolts near the rear of the treadmill, usually concealed by a plastic cover.2. Use an Allen wrench to carefully adjust these bolts. Remember to make small adjustments, typically a quarter to a half turn at a time.
3. If the belt tension is good, only use the left bolt and then turn it 1/4 turns in the direction that you want the belt to go. Make sure to check the level of the treadmill (side to side) first.
4. Tightening the bolt on one side will pull the belt towards that side, while loosening it will move the belt in the opposite direction.
5. After making an adjustment, run the treadmill for a short period to observe the belt's behavior.
6. If the belt is still not tracking correctly, make further adjustments, but always in small increments.
Avoid over-adjusting, as this can exacerbate the problem. Do not overtighten it as this can damage the belt, which will then need to be replaced.
If you're unsure about the process or encountering persistent issues, consult your treadmill user manual or seek professional assistance.
Prevention
1. Place your treadmill on a level surface to prevent uneven wear and tracking issues. A tilted treadmill can cause the belt to veer off-center.
2. Overloading your treadmill can strain the motor and belt, leading to tracking problems. Stick to the recommended weight limits to maintain optimal performance.
Noise and Vibration
Causes
1. Bearing Noise: This is often a high-pitched squeal or grinding sound. It can be caused by worn bearings in the motor, rollers, or other moving parts.
2. Belt Noise: A squeaking or screeching sound can be caused by a worn or misaligned motor belt.
3. Pulley Noise: A squeaking or rattling noise can be caused by worn or loose pulleys. In this case, front roller needs to be tightened or replaced.
4. Motor Noise: A humming or grinding noise from the motor can signify internal issues like worn-out brushes or bearings.
5. Motor Fan: The motor fan and the fins within the speed sensor can cause noise when they rub against each other or other components.
Quick fixes
1. Check for misaligned parts rubbing together. The belt, pulleys, motor fan, and speed sensor should all be aligned properly.
2. Inspect the belt guides. If they're pressing too hard on the belt, they might cause a whining noise. You can adjust them by gently bending them.
3. For screeching noises, check the motor belt and front roller pulley. A worn belt or loose pulley could be the culprit.
Treadmill Doctor Tip: Try rubbing a bar soap like Ivory on the grooved side of the belt. This should stop the noise in most cases. Or, apply some belt dressing. If neither works, replace the belt.
4. Motor and bearing noise require more attention. Disconnect the belt and listen to the motor for any abnormal sounds. Replacing bearings or the motor itself might be necessary.
When to seek help?
While many treadmill noises can be addressed with simple fixes, there are instances when professional help is necessary:
1. Persistent or Worsening Noise: If the noise continues or gets louder despite your troubleshooting efforts, it's best to consult a professional.
2. Smoke or Vibrations: If the noise is accompanied by unusual vibrations, smoke, or burning smells, immediately stop using the treadmill and contact a professional.
3. Warranty Coverage: If your treadmill is still under warranty, contacting the manufacturer's customer service for assistance is advisable.
Facing treadmill issues like belt tracking or excessive noise? Schedule a service appointment with Treadmill Doctor and let our expert technicians diagnose and resolve the problem promptly. We'll connect you with the best technician in your area to get your treadmill back in top shape.
Fun Fact: Underwater treadmills were originally developed for horses! Yes, you heard that right. Veterinarians and horse trainers used them to rehabilitate injured horses, and the technology was later adapted for human use
Chapter 7
Top Treadmill Belt Brands and Prices
You should change the treadmill belt when it shows visible wear patterns like cracks, fraying or excessive smoothness on the underside. These signs indicate the end of the treadmill belt lifespan. Generally, it is recommended to replace annually lubricated residential belt every 5-7 years for optimal performance and user safety. You can easily purchase a replacement belt for any of the top treadmill models either from the official website or from the Treadmill Doctor (US) website. This section entails a brief comparison of the top-selling treadmill brands and their belts.Top Treadmill Belt Brands
NordicTrack Treadmill Belt
Fun Fact: In 2007, NordicTrack iFit integrated Google Maps technology into its treadmills, allowing users to virtually run on real-world routes. The treadmill would automatically adjust its incline and decline to mimic the terrain of the chosen route.
ProForm Treadmill Walking Belt
Xterra Treadmill Belt
Sole Treadmill Belt
Fun Fact: Tread—from Peloton is designed to offer a comprehensive & immersive fitness experience with features like Interactive workouts, Personalized coaching, yoga & meditation classes.
True Fitness Treadmill Belt
Gold’s Gym Treadmill Belt
Horizon Walking Belt
Precor Treadmill belt
Life Fitness Walking Belt
Fun Fact: The year 2007 marked a significant milestone in treadmill technology with the release of Life Fitness' Elevation Line, the first one to feature iPod compatibility.
Weslo Treadmill Belt
4 Factors Affecting Treadmill Belt Cost
1. Belt Material Quality: Urethane belts are the highest quality belts available as Gym Tough line on Treadmill Doctor. Other high-quality materials like rubber and polyurethane offer good durability and traction too. These cost around $100 and above.
2. Treadmill Model Compatibility: Specialized belts designed for specific treadmill models may be more expensive, especially if they require unique features or adjustments.
3. Online vs. Offline Purchase: Online retailers offer competitive prices and deals, while offline stores have higher overhead costs reflected in their pricing.
4. Shipping Costs: For online purchases, shipping costs vary based on the belt's size, weight, and shipping distance.Where to Buy Treadmill Belts?
When it comes to buying treadmill belts, online retailers offer a convenient and reliable solution. We, at Treadmill Doctor, specialize in providing high-quality treadmill belts at competitive prices. Our extensive selection ensures compatibility with various treadmill models, and our expert team is always ready to assist you in finding the perfect fit.
Visiting local stores with positive Google reviews can be a good option, too. However, online shopping offers the advantage of a broader range of choices, detailed product information, and convenient home delivery.
Frequently Asked Questions (FAQs)
Q1. How often should I replace my treadmill belt?

Q2. Can I repair a damaged treadmill belt?
In this case, you can cut off the damaged part by following this tutorial.
Q3. What is the best treadmill belt material?
Q4. How do I lube or grease my treadmill belt?
Q5. Can I use a treadmill belt from a different brand?
Ans. It is recommended to purchase an OEM (Original Equipment Manufacturer) replacement belt from a reputable authorized dealer. But in case of unavailability, you can also buy replacement belts for the same model from local dealers or trusted online treadmill replacement parts stores.
But do not purchase a belt of a different brand as it may be a bad fit that may result in slipping or the belt going off track.
Q6. What size treadmill belt do I need?
Ans. To determine this, you can simply measure the existing walking belt or check the treadmill user manual. To measure the belt yourself, measure the width of the belt at its widest point. Now, measure the total length of the belt, including the portion that wraps around the rollers.
Once you have these measurements, you can search for a replacement belt that matches the exact dimensions.
Q7. What size treadmill belt for running?
Q8. How do I know when it is time to replace my walking belt?
Ans. Your treadmill belt needs replacing if you see:
Cracks, tears, or extreme wear on the surface.
Curled or torn edges.
A super smooth underside with no grip.
Excessive looseness or slippage.
Squeaking that persists after lubrication (might indicate drive belt issue).
Also, pay attention to performance changes like speed inaccuracy or sluggishness.
Q9. Why is my belt slipping?
Ans. There can be three main reasons for a treadmill belt slipping:
The walking belt may be too loose.
The drive belt between the motor and the front roller may be slipping.
The pulley on the front roller may have lost its grip on the front roller.
Q10. Where do I find my treadmill model and serial number?
Ans. For folding treadmills, fully fold it to access the model number plate. Alternatively, the model number is often found at the front base of the treadmill, near the power cord entry point.
Once you've located the model number, carefully copy it, ensuring accuracy. The model number is typically prefixed with "Model Number." Avoid confusing it with other numbers or letters on the label.
To better understand, you can watch this video tutorial on how to find your model number.
Q11. How to center my walking belt?
Ans. To center your treadmill belt, start by unplugging the treadmill for safety. Locate the adjustment bolts on the rear rollers. Using a hex key, make small adjustments to these bolts, one at a time. Turn the bolt on the side where you want the belt to move. A quarter turn is usually sufficient to start.
Observe the belt as you make adjustments. If the belt moves in the wrong direction, press the stop button and readjust the bolt in the opposite direction.
Q12. How do I tighten my walking belt?
Ans. Find the adjustment bolts on the rear rollers of the treadmill. They usually require a hex key or Allen wrench. Turn both adjustment bolts clockwise, a quarter turn at a time. Alternate between the two bolts to ensure even tension. Lift the belt slightly. You should be able to fit your hand snugly between the belt and the deck.
Be cautious not to overtighten, as this can damage the motor and rollers.
Q13. Do you have instructions to replace the walking belt?
Q14. Why does my belt slow down when I step on it?
Ans. There are four main reasons for this issue:
The treadmill belt and/or deck are worn.
The walking belt and/or motor belt are too tight if you have adjusted them recently.
The motor has lost torque and needs brushes or has demagnetized.
The controller is dropping output.
Q15. Why does my treadmill shut down during a workout?
Ans. Treadmills may shut down during workouts due to various reasons.
Excessive friction caused by a lack of lubrication can trigger automatic shutdowns to prevent damage.
Worn-out belts or motor issues can also lead to unexpected stops.
Additionally, the treadmill may have built-in safety features that halt operation if it detects overheating or other potential problems.
Q16. Why do I smell burning from my treadmill?
Ans. A burning smell from your treadmill is a serious issue that requires immediate attention. Common causes include excessive belt and deck friction, a motor short, or a short in the wiring or electronics.
In severe cases, the core of the motor may overheat due to friction or obstructions.